Using app.equipe.com for timekeeping requires that you first install the program Equipe ATU Connector. That program converts the serial interface for time keeping and makes it available for the system on the internet.
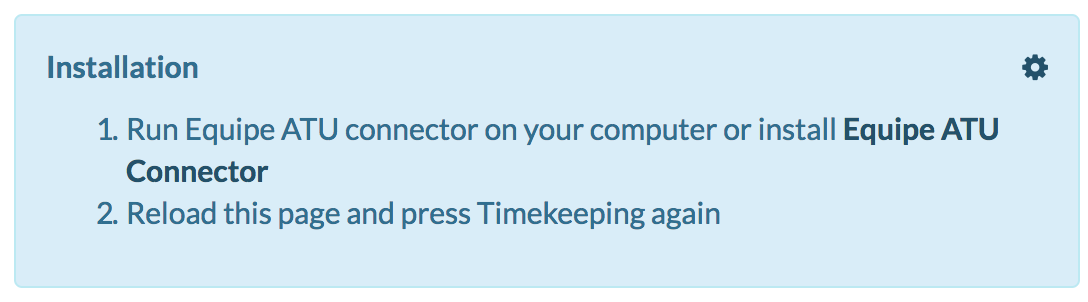
When you press the button Timekeeping there will appear a link to the installation for the ATU connector (if it already is not installed and opened on the computer). If you have installed it, start it as any program and then press Timekeeping in app.equipe.com.
If there is not any connection to the ATU, check that the settings to the settings for the ATU is correct by pressing the small cog-wheel in the blue info-screen with the link to the installation. It should say wss://atu.equipe.com:21001 (the address to the ATU) in the field for the ATU. Try to reload the page.
ATU-X
Equipe ATU connector works with ATU 8, 9 and X. If you have an ATU-X it should be set to use that USB protocol.
Verify the version of the software for the ATUX before continuing
It should be version 0.49 or higher. If not, use the regular ATU9 protocol. Then set the Equipe ATU Connector for ATU9
It should be version 0.49 or higher. If not, use the regular ATU9 protocol. Then set the Equipe ATU Connector for ATU9
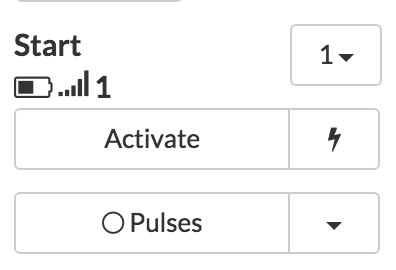
This enables, as the picture above shows, that you can see the status of the battery, signalstrengt and if there is a need for resend to send the pulse from the photocell at the arena.
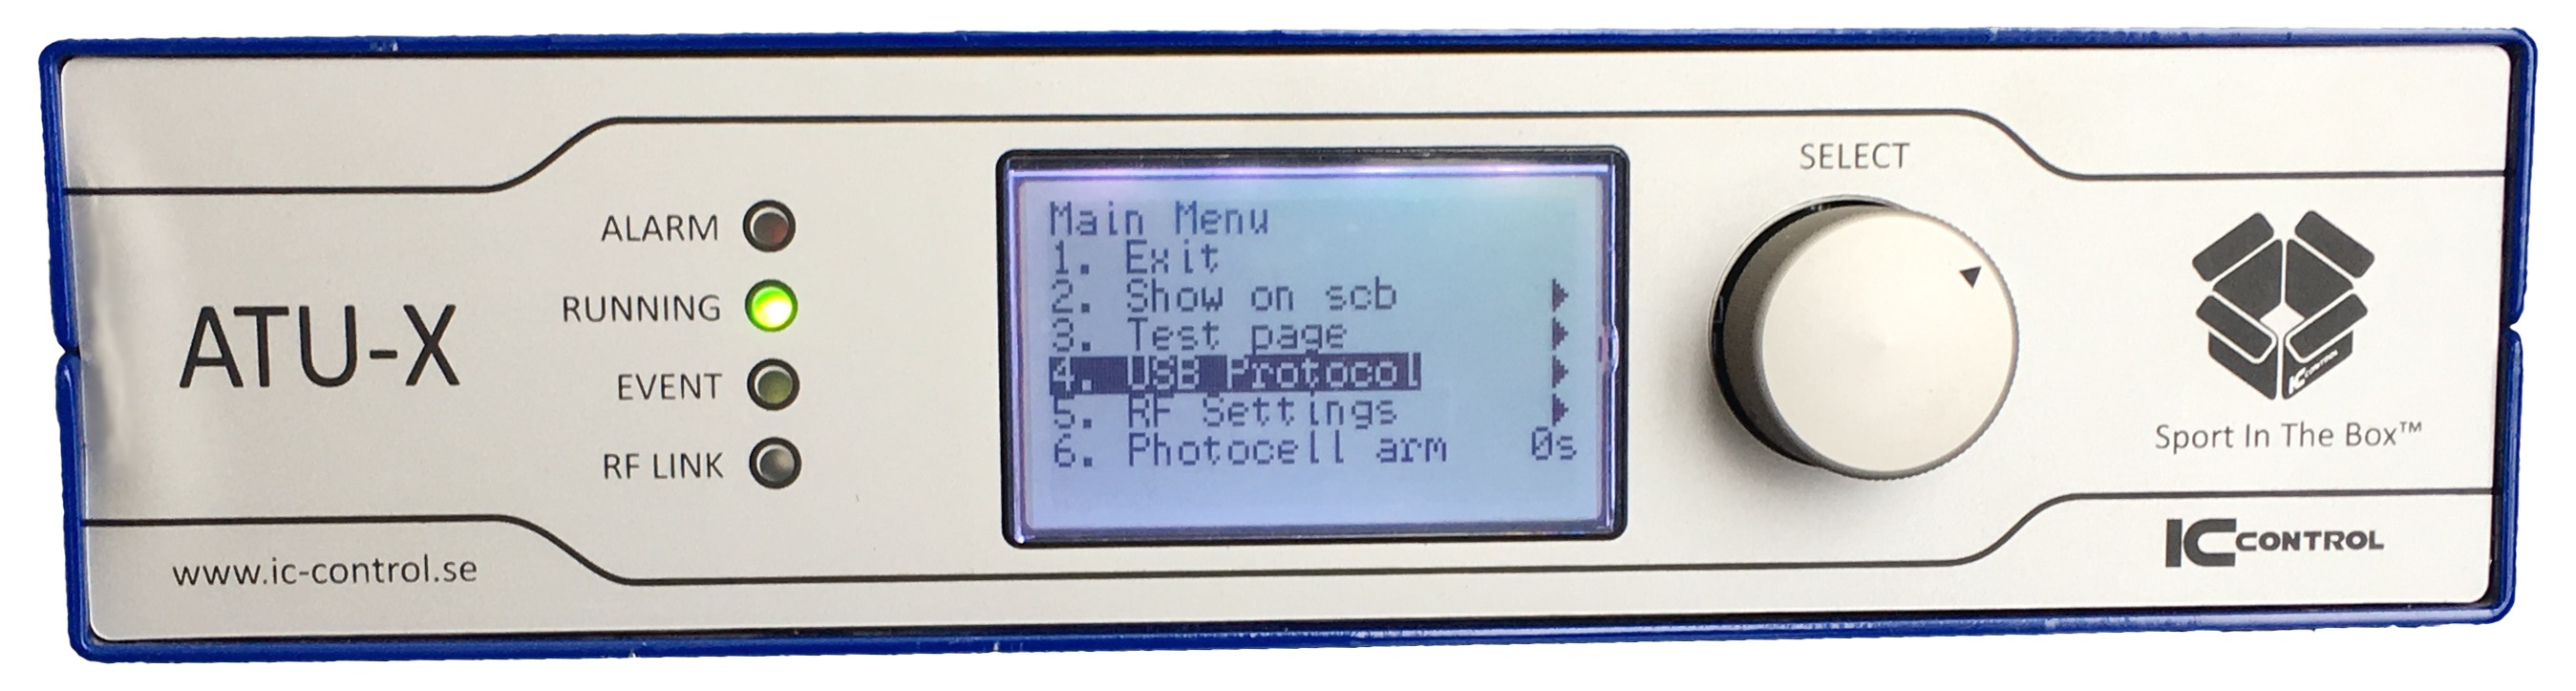
Press one time on the ATU's scroll wheel (SELECT) to get to the settings. Spinn the wheel and you'll get to USB protocol, the press the button again to get to the next level of settings.
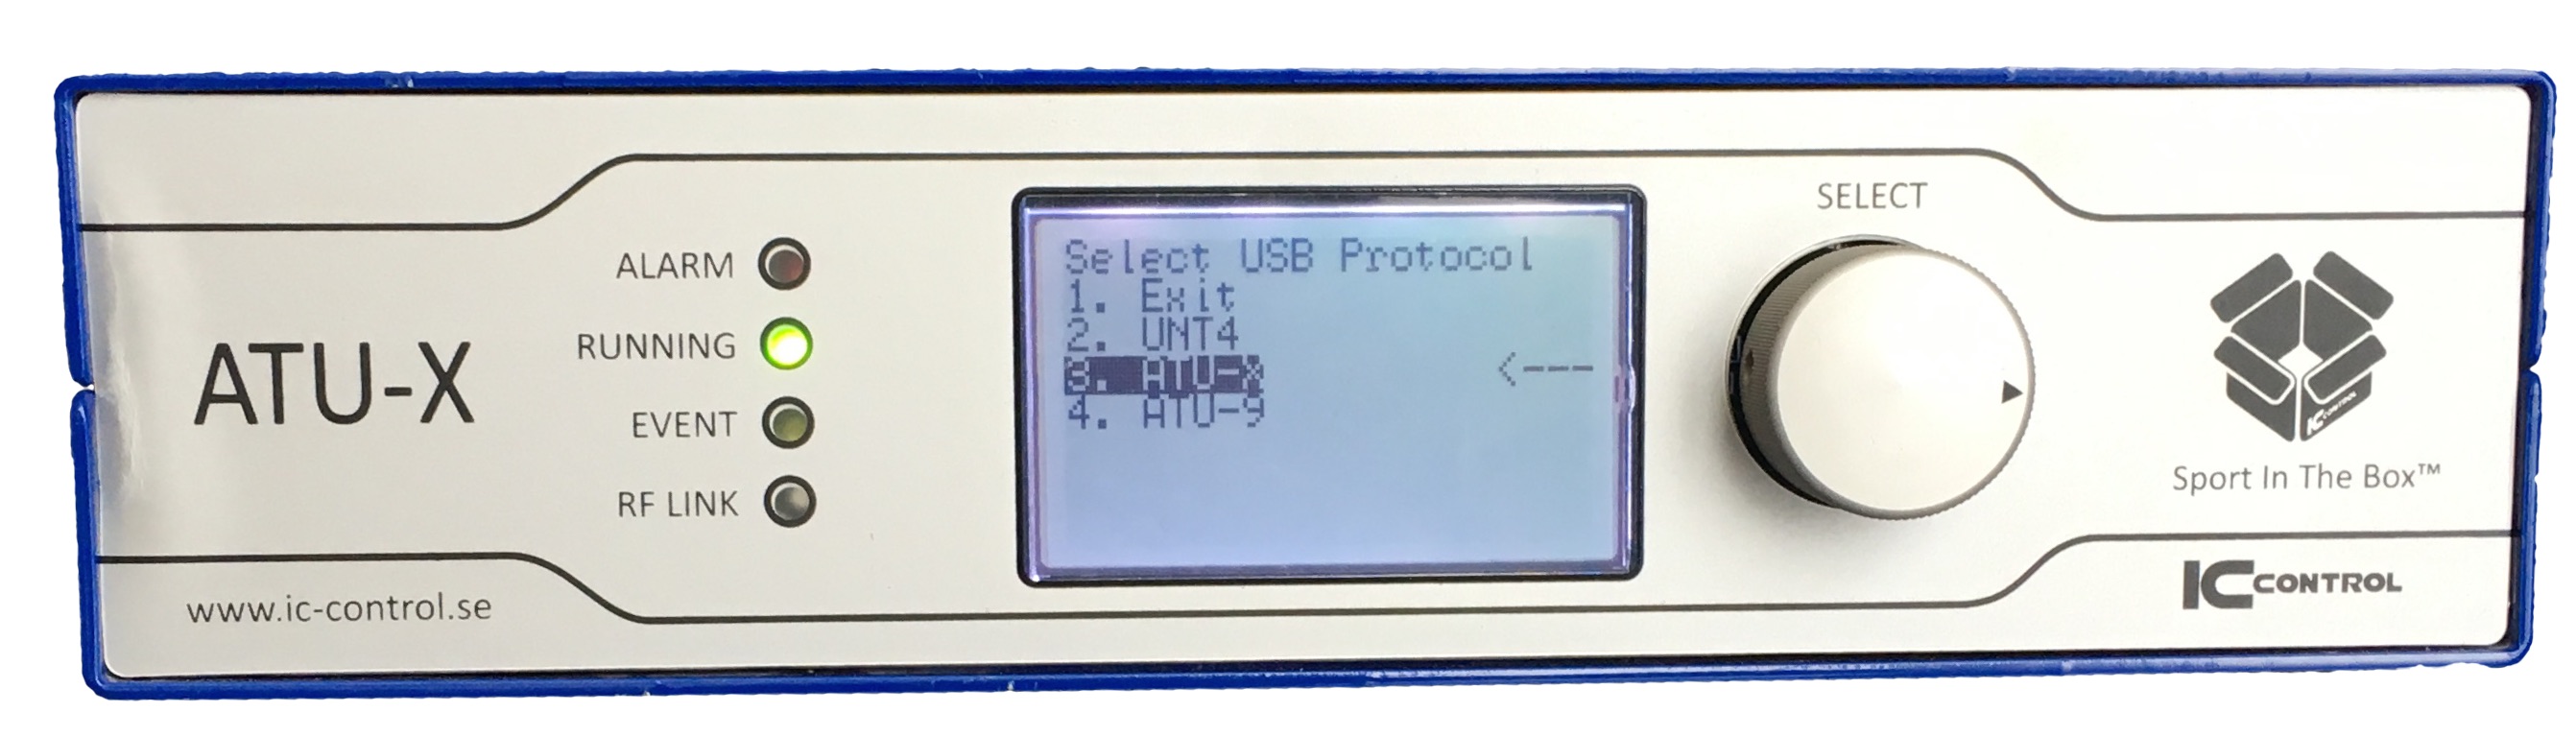
Scroll down to ATU-X and press the wheel again. Then the ATU will return to the main settings. To initiate the setting, shut down the ATU by pressing the button on the back. Let it be shut down for approx. 10-25 seconds and then reboot.
Equipe ATU Connector
The software needs to be installed on the computer once, which preferably is the first time it should be used. The next time, you'll only need to start the program before opening the timekeeping-view in app.equipe.com
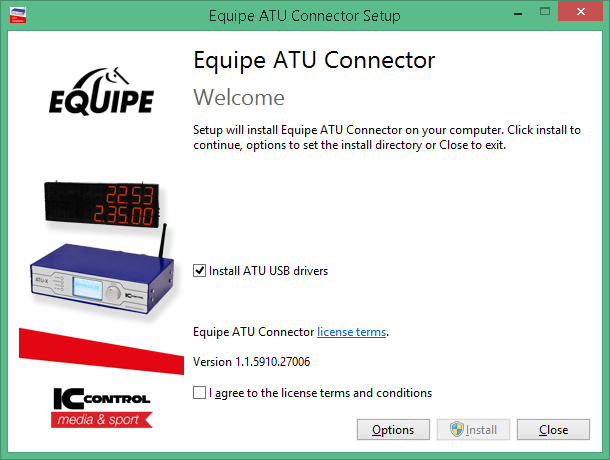
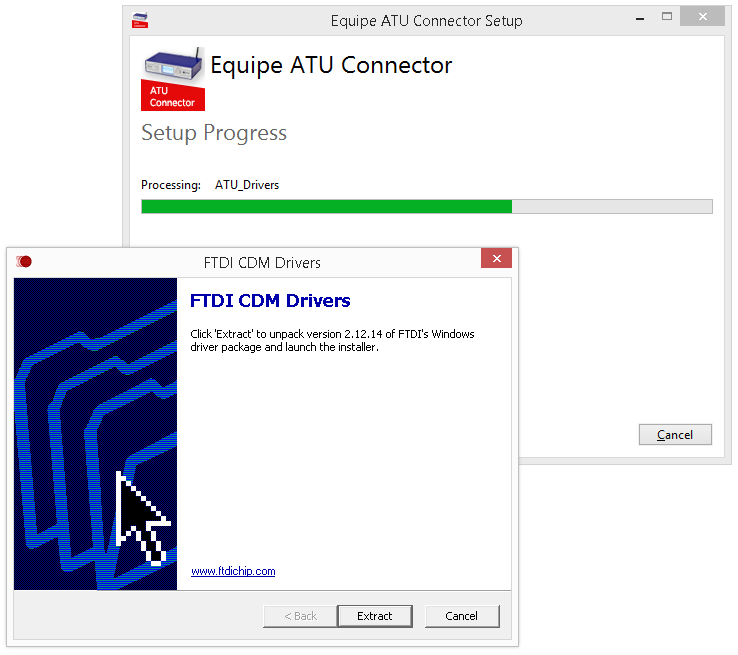
Together with the software the drivers for the ATU, CDM Drivers, follows. It can happen that the installation-window for the drivers gets behind the window for the software. Use the activity control in windows to get to the installation for the drivers. Press extract and then follow the instructions.
When everything have been installed, the Equipe ATU Connector can be started by pressing the launch-button. The software will also install an icon on the desktop, which can be used in order to launch the software. This is how the users interface looks like.
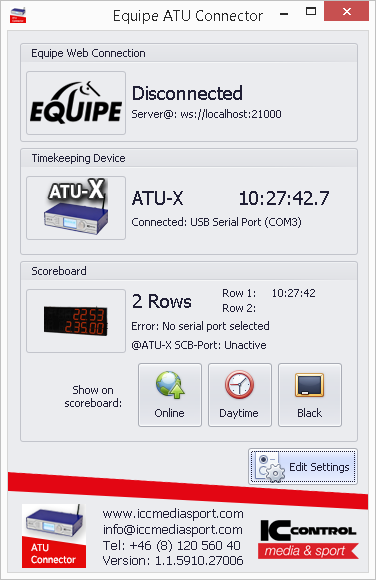
Equipe Web Connection
Shows status and settings to connect to the web from Equipe ATU Connector. The adress ws://localhost:21000 should be the same as the one in app.equipe.com. This adress is set as standard. But if you have changed it to for example use the timekeeping without the ATU, press the cogwheel to the right, after pressin on the timekeeping in the view for results registration, and then write the adress in the box that appears.
Shows status and settings to connect to the web from Equipe ATU Connector. The adress ws://localhost:21000 should be the same as the one in app.equipe.com. This adress is set as standard. But if you have changed it to for example use the timekeeping without the ATU, press the cogwheel to the right, after pressin on the timekeeping in the view for results registration, and then write the adress in the box that appears.
Or, if the timekeeping already have been activated, press the daytime in order to get the same option for settings. After making the change, save and then reload the page.
Timekeeping Device
Displays current status for ATU; which type of ATU it is, which COM-port it is connected to and the running time from it.
Displays current status for ATU; which type of ATU it is, which COM-port it is connected to and the running time from it.
Scoreboard
Here there are three different options. Online displays the current running time on the scoreboard, Daytime displays daytime and Black empties the scoreboard completely.
Here there are three different options. Online displays the current running time on the scoreboard, Daytime displays daytime and Black empties the scoreboard completely.
If you arn't making any changes, the software will automatically switch to online when the timekeeping starts and when app.equipe.com is no longer connected the software will switch to display daytime instead. When ATU Connector is shut down, the scoreboard will go black.
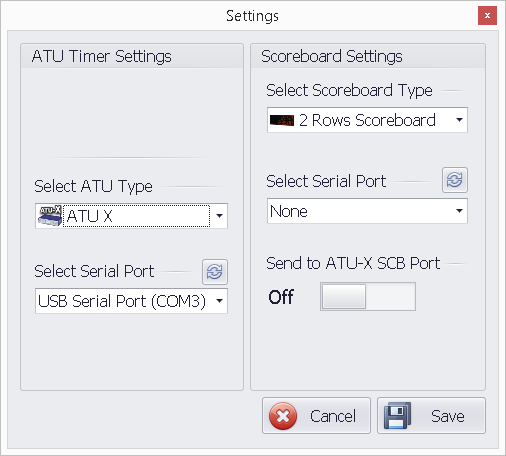
Press the button Edit settings in Equipe ATU Connector and set which COM-port (Serial port) the ATU is connected to and which ATU you have. You are able to choose between ATU 8, 9 or X.
If you have a scoreboard, set which COM-port it's connected to and which sort of scoreboard it is.
Timekeeping interface
Reload the window and press the button for timekeeping. The UI for the timekeeping will appear.
Make sure
Never to activate the timekeeping on more than one computer or several tabs/windows.
Never to activate the timekeeping on more than one computer or several tabs/windows.
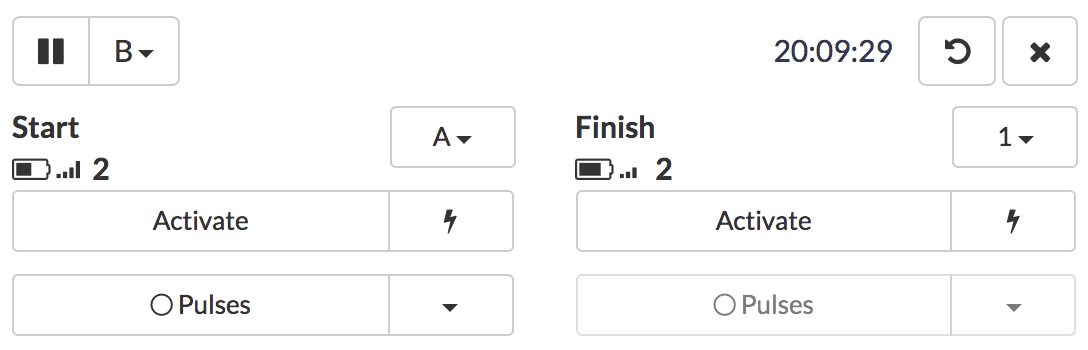
Set which port the countdown-button for the ATU is connected to. Normally it is any of the A-D ports.
Make the same for all of the lines (photocell+reflector) which is in the arena. These have numbers. When someone/something crosses a line the passagetime will be saved underneath pulsesfor each of the lines. The pulses can if used to correct, if you might have forgotten to activate a line or started the timekeeping on the wrong rider. If you press on the dropdown-list and a list with the stored pulses for the will appear and you'll also see the running time for each of them.
Make the same for all of the lines (photocell+reflector) which is in the arena. These have numbers. When someone/something crosses a line the passagetime will be saved underneath pulsesfor each of the lines. The pulses can if used to correct, if you might have forgotten to activate a line or started the timekeeping on the wrong rider. If you press on the dropdown-list and a list with the stored pulses for the will appear and you'll also see the running time for each of them.
Start the countdown either by pressing ont the button connected to the ATU or the one in the interface on the computer. Pause/Start the countdown by pressing the button again.
Focus will then switch so that the start can be activated- the button gets a more grey color. When the button have been activated (press e.g. Enter to do this) it will be green and the time will start when the rider crosses the line.
Then the focus will switch to finish. It will be activated by doing the same procedure as above and will stop when the rider crosses the finish-line.
To the right of the start and finish-button there is a smaller button with a lightning which can be used in order to activate the lines manually. When the time allowed in the first phase have been exceeded the lightning will change in to a arrow and by pressing the button the timekeeping will continue for the second phase. This is useful for example when the first three riders are on the arena and the judges/ course designer discusses the time allowed.
ATU-Settings
You find the settings for the timekeeping by pressing the daytime or if the settings have not yet been configured by pressing the cogwheel.
ATU
The adress for which the ATU is found on can be changed or set here, normally ws://localhost:21000 is the one. But if you use an iPad or phone which is used in the same network the setting can be different depending on the IP-adress to the computer running the ATU Connector. An iPad can be nice to use when setting up the lines in the arena to be able to see that it works.
The adress for which the ATU is found on can be changed or set here, normally ws://localhost:21000 is the one. But if you use an iPad or phone which is used in the same network the setting can be different depending on the IP-adress to the computer running the ATU Connector. An iPad can be nice to use when setting up the lines in the arena to be able to see that it works.
If you want to use the timekeeping without an ATU, empty this field and the timekeeping will run according to the clock of the computer.
Countdown
The time for the countdown can be changed here, when the time is exceeded the running time will automatically begin. Normally and as standard 45 seconds is set.
The time for the countdown can be changed here, when the time is exceeded the running time will automatically begin. Normally and as standard 45 seconds is set.
Continue on existing time
Is used in for example driving when you continue on the time that already have been registered. Normally this is not set. Note that if you change this, then set it back to standard after the end on the competition so that it will not be the same for the next one operating the timekeeping.
Is used in for example driving when you continue on the time that already have been registered. Normally this is not set. Note that if you change this, then set it back to standard after the end on the competition so that it will not be the same for the next one operating the timekeeping.